How to Solve: AAC Heavyweight M1 (Savage)
Published on , 3893 words, 15 minutes to read
FFXIV raid mechanics explained in plain language.
This is a long-form written guide for the fight AAC Heavyweight M1 (Savage) in the game Final Fantasy 14, where the challenger and their seven friends fight the Elezen succubus Vamp Fatale. You may call this the XeBin guide in party finder listings.
If you want to experience this fight, don't read this guide. This guide is based off of the Toxic Friends raidplan, the Hector Lectures strategies used by North America Party Finder raiding culture, and insights I have gained from running this fight in a static group. A lot of this advice is geared towards healers as I typically run as a healer (AST/SGE).
This fight assumes minimal raiding experience beyond what is required to beat the normal raids. All vocabulary and common mechanics terms will be explained inline.
These strategies assume that every member of your group has an item level (IL) average of at least 780 (via Augmented crafted gear and an Enuo weapon). If you are under IL 780, you may need to mitigate (mit) more heavily than if you have higher item levels. Play it by ear and don't be afraid to break out Eukrasian Prognosis or Concitation if you are not sure what mits are required for each hit. This strategy guide will also tell you to drastically overmit beyond what is required in practice. This is intentional so that you know what fits where.
https://files.xeiaso.net/blog/2026/m9s/index.m3u8
Base vocabulary
The theme of this fight is that every mechanic is blanketed in a coating of raidwide attacks (ones that hit everyone regardless of distance from the boss or other players). Every mechanic in this fight looks like a sandwich of the following:
- Light mit raidwide
- Mechanic
- Another light mit raidwide or a heavy mit one for flavour
Raidwide attacks
In this fight, raidwide attacks come in three flavours:
- Ignorable: Don't mit this attack, throw an AoE heal or two afterwards. Maybe fire off some shields so you don't have to care as much.
- Light mit: This is enough damage to be annoying, but not enough to actually risk killing people. This is where your 10% mits, Addle, Feint, and Reprisal make a difference.
- Heavy mit: If you are not careful, this is going to kill people. This is when you break out big guns like Spreadlo, Holos, Temperance, or Sun Sign. Remember: if people live with more than 1 HP, they didn't die.
Stack attacks
Stack attacks have two kinds to keep in mind:
- Light mit: Mostly seen later in the fight when splitting into light parties for Undead Deathmatch or for the stack mechanic in Hell in a Cell. Use your judgement, make sure people don't die and get healed.
- Akh Morn: Technically this fight doesn't have any hard casts of Akh Morn, but there are many multi-hit stack attacks that are functionally an Akh Morn. This is where you break out the big guns like Liturgy of the Bell, Panhaima, Macrocosmos, or Seraphism-boosted Spreadlo.
Tankbusters
This fight has particularly meaty tankbusters. These tankbusters really do need to be mitted for consistency. Every healer (save Scholar) has a 10% single target mit that makes a huge difference and can be the reason tanks live or die. A well-placed Haima can also make a huge difference during Hell in a Cell as every tank hit in that mechanic is a tankbuster hit.
Mit sheeting
Healer mits:
| Mit class | White Mage | Astrologian | Sage | Scholar |
|---|---|---|---|---|
| Ignorable | Maybe Swiftcast -> Medica 3 if you feel generous | AoE heal over time | Swiftcast -> Prognosis after | Selene heals |
| Light mit | Plenary Indulgence | Heal over time | Kerachole | Sacred Soil / Fey Illumination |
| Heavy mit | Temperance -> Divine Caress | Neutral Sect -> Sun Sign -> Shields | Holos -> Physis | Seraphism -> Spreadlo |
Note: healers WILL run out of mits, especially you have a Sage and they die at any point. Do not feel afraid to burn heavy mits in light mit mechanics in order to prog.
DPS / Tank mits:
| Role | Light mit | Heavy mit | Akh Morn |
|---|---|---|---|
| Melee DPS | Ignore | Feint (trade with other melee) | Feint + Job gimmick |
| Reaper | Ignore | Feint | Arcane Crest |
| Tank | Ignore | Rampart or Reprisal | Reprisal + 40% mit |
| Caster | Ignore | Addle | Addle + Job gimmick |
| Pictomancer | Ignore | Addle | Addle + Tempera Coat -> Tempera Grassa |
| Ranged DPS | Ignore | Ignore | Job gimmick |
| Dancer | Ignore | Ignore | Shield Samba |
| Bard | Ignore | Troubadour | Troubadour if up |
Fight-specific mechanics
This fight has a few mechanics that get repeated multiple times across the encounter. For brevity's sake, each of them will be explained here with backreferences so you can refer to them later.
Satisfied
Any time anyone fails a mechanic they get a 10% Damage Down debuff and Vamp Fatale gets a stack of Satisfied. If too many players get Damage Downs, you will not be able to clear the fight.
Every 4 stacks of Satisfied Vamp Fatale's raidwides hurt more, AoEs will get bigger, and her Half Moon cleaves get wider. If you get more than 16 stacks of Satisfied, you're probably going to get obliterated by the raidwides. Try to get as few stacks of Satisfied as possible.
Every so often Vamp Fatale will cast Crowd Kill which will make her gain 4 stacks of Satisfied regardless of player actions.
Half Moon
Half Moon is similar to Omega's Starboard/Larboard Wave Cannon. When she casts Half Moon, she will cleave half the arena and then immediately cleave the other half. This is a core verb in the fight and will often be woven into other mechanics. At eight (8) stacks of satisfied, Half Moon gets a lot larger and cleaves from her hitbox out instead of from halfway out.
For consistency: always assume that she has eight stacks of Satisfied and go way farther than you need to in order to avoid the cleaves.
You can tell which direction the cleave is going based on the position of the ball of aether Vamp Fatale is holding. If you're on the opposite side as the ball of Aether, you're good. If not, you're giving her a stack of Satisfied. If you want to practice this mechanic in particular, the normal version of this fight uses it pretty heavily.
Hardcore
Hardcore is a pair of meaty AoE tankbuster hits that target the top two entries in the aggro list. As Vamp Fatale gets more stacks of Satisfied, the tankbusters will hurt a lot more and the AoEs get bigger until it's unsolvable.
If she has more than 12 stacks of Satisfied, either this attack will kill you or one of the next ones will. If you find yourself in this situation, consider alternate strategies.
Vamp Stomp
Vamp Stomp is one of the easiest mechanics of the fight that will also cause you to wipe the most. Before I explain the mechanic, here's a high-level diagram that explains all the parts:
When you transition into this mechanic, you want to have everyone in modified clock spots with ranged on intercardinals and melee on cardinals, kinda like this:
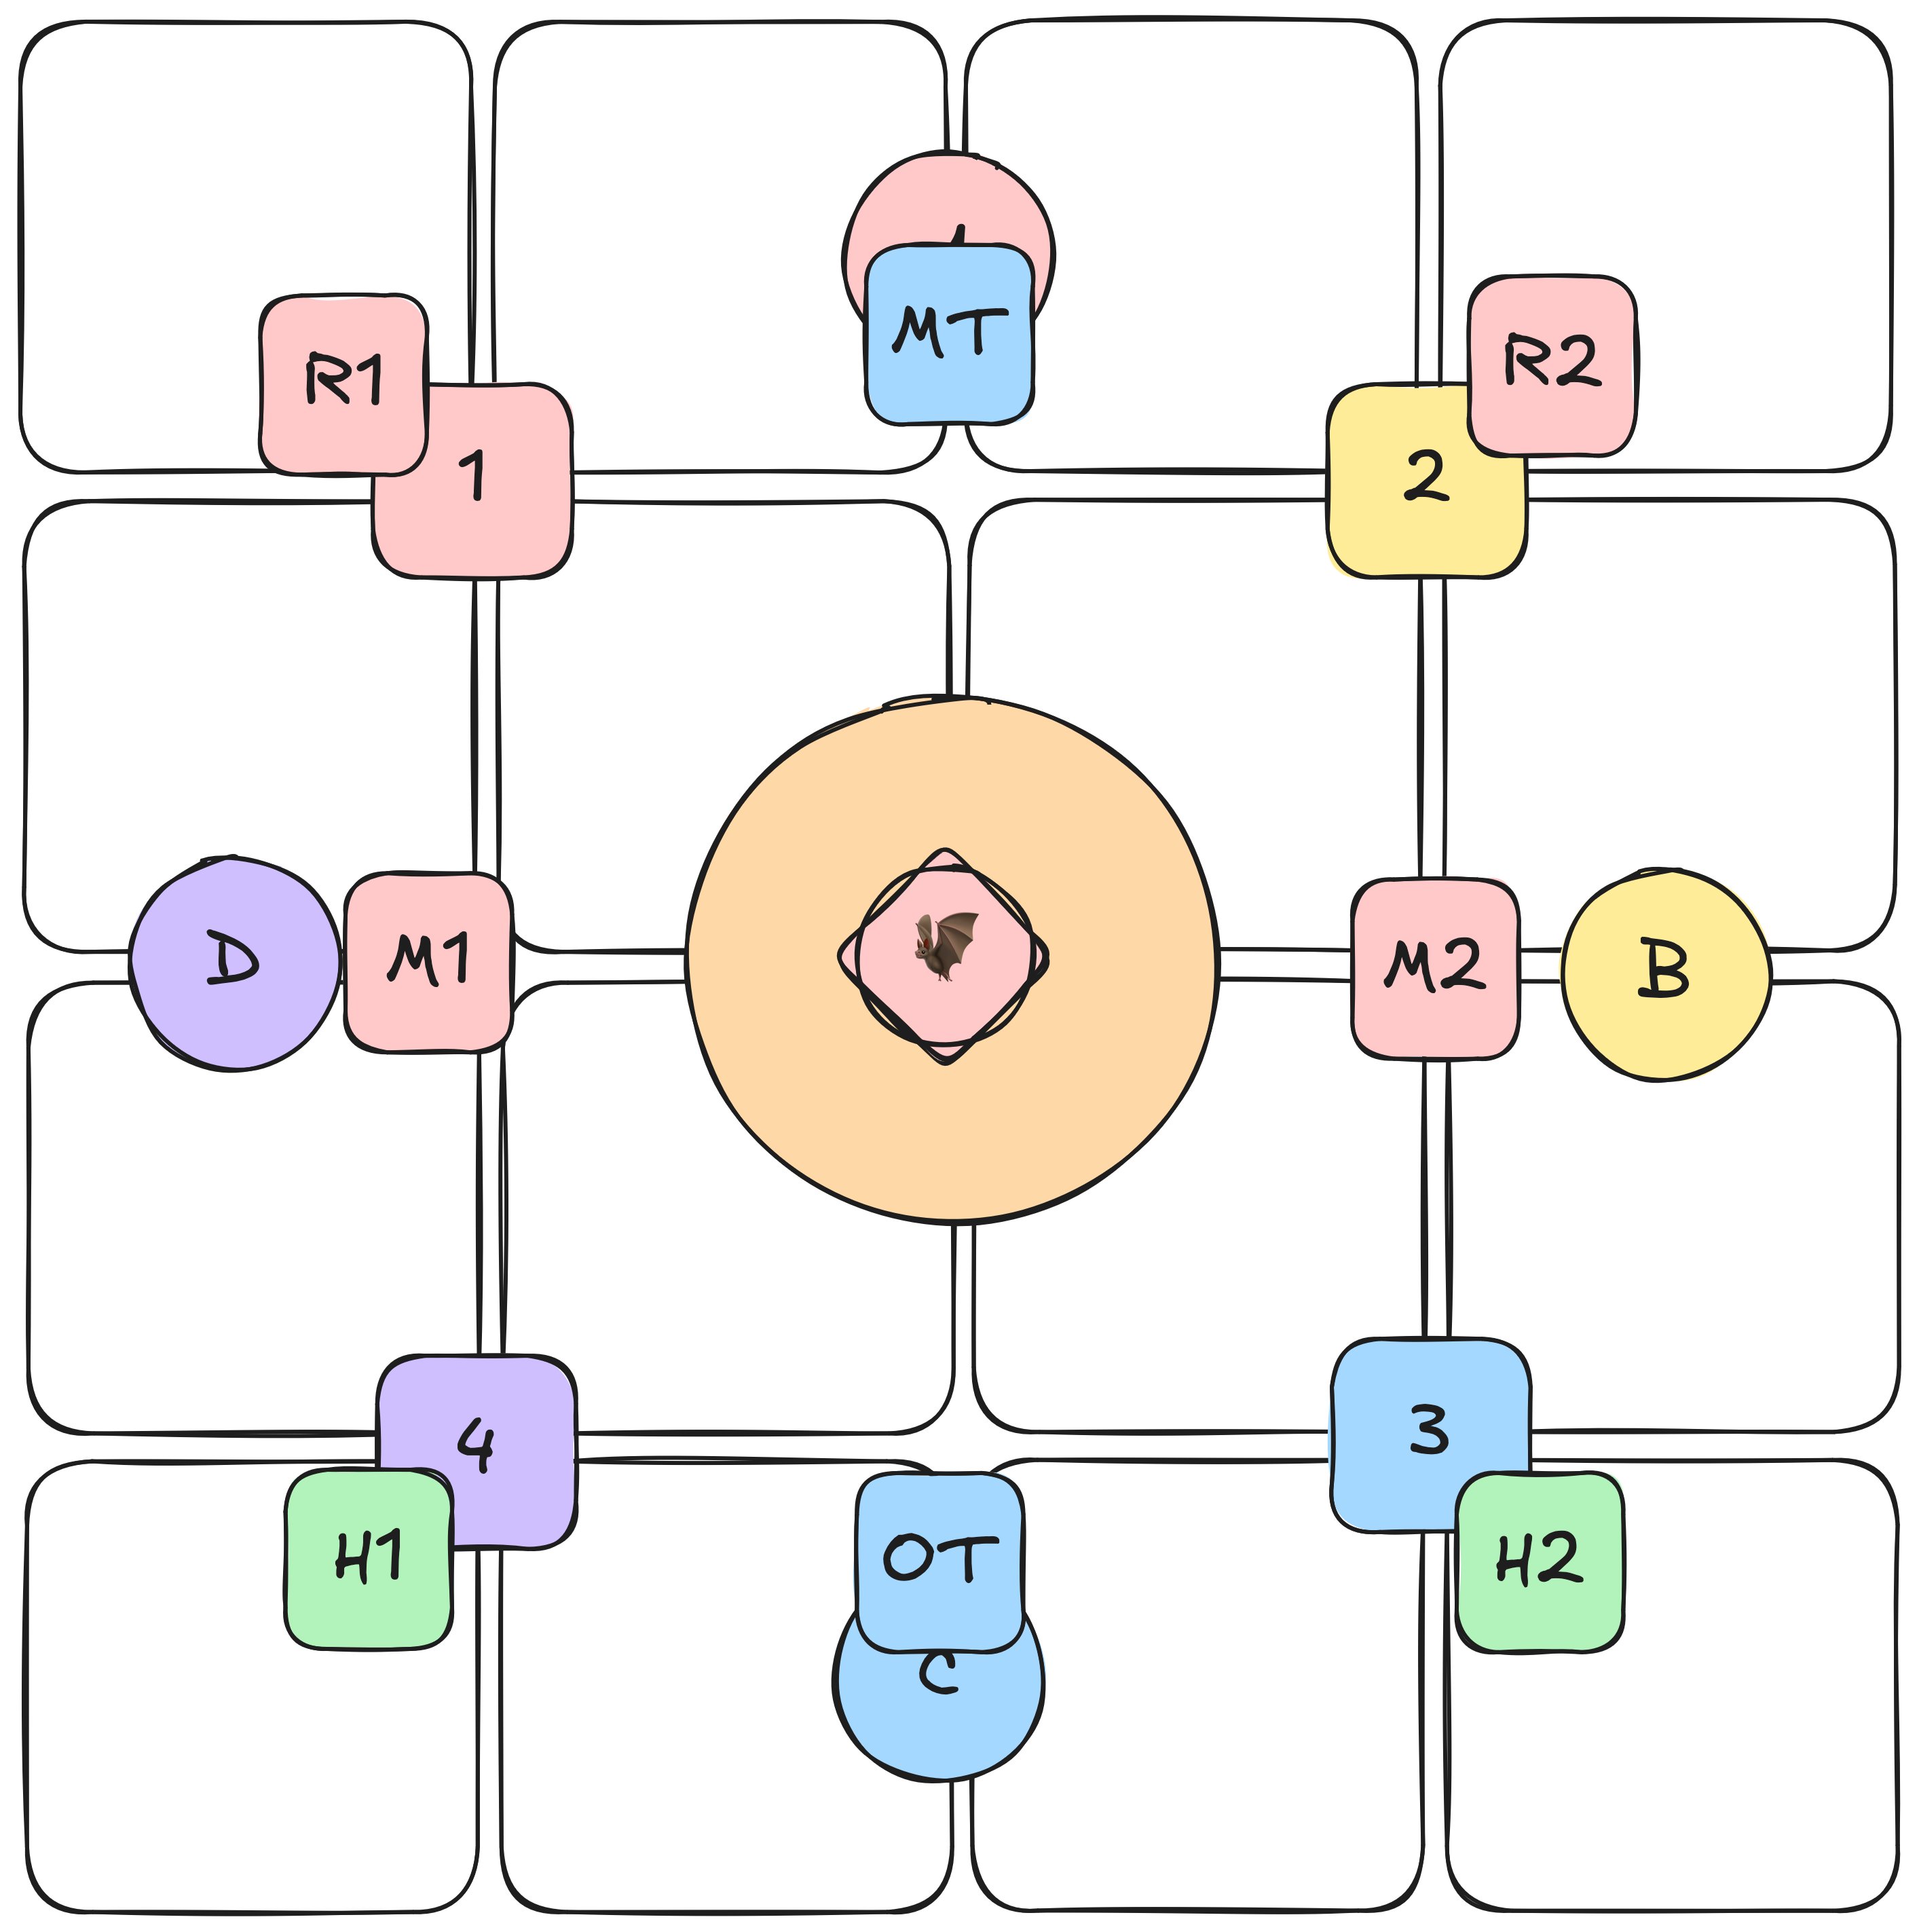
When this mechanic starts, everyone gets a Curse of the Bombpyre debuff. Vamp Fatale will shoot out an expanding shockwave ring. When the ring hits you, it cleanses your debuff and explodes a point-blank AoE that hits you for about half your health and gives you a very short Magic Vulnerability (magic vuln) debuff.
If you get hit by any AoEs while you have a magic vuln, you will instantly die. This pierces tank invulnerability skills. Try to not get venn diagrammed.
Vamp Fatale spawns three rings of bats:
- An inner ring with two bats
- A middle ring with three bats
- An outer ring with five bats
When bats are hit by the ring, they also explode into a point-blank AoE that hits for about half your health and gives a magic vuln.
The trick for this mechanic is to make sure everyone cleanses their debuffs without killing everyone else in the process. The best order to resolve this is tank/melee -> ranged -> healer. Keep in mind that the bats are randomly placed and will randomly go either clockwise or counter-clockwise. This will take some practice for you to know how to read your party to know when it is safe to cleanse your debuff.
Here's a few tricks I've learned to make things somewhat consistent:
- If the inner ring of bats is positioned on the tanks, have melee go first.
- If the inner ring of bats is positioned on the melees, have tanks go first.
- If it's diagonally offset, agree who should go first with your group.
If anyone gets a magic vuln from the bats or dies from getting venn diagrammed, Vamp Fatale will gain a stack of Satisfied.
Practice this mechanic a bit until you can do it without thinking.
Basic Raidwides
There are a few other raidwide casts in this fight that are mostly the same light mit raidwide, but a few of the variants have some implications you should keep in mind:
- Killer Voice: The basic light mit raidwide. Sometimes you can get away with ignoring this and dumping out heals after the hit. If you and your group are close to best in slot, you can get away with ignoring it for the most part.
- Crowd Kill: Another light mit raidwide but it makes Vamp Fatale gain four stacks of Satisfied. This will be cast at key points in the fight and gradually increases the potency of all her attacks as the fight goes on. The last time she casts this, she will hard enrage and just kill the party.
- Sadistic Screech: Another light mit raidwide that edits the arena. If the arena is a 4x4 grid, it turns into a 4x2 grid or vice versa.
- Finale Fatale: Yet another light mit raidwide that makes the arena into a circle instead of a square. If you walk out of the circle, you get killed. Try not to do that.
Brutal Rain
Functionally, this is an Akh Morn but empowered by her stacks of Satisfied. The spread for Satisfied stacks vs Brutal Rain hits roughly translates to this:
| Stacks of Satisfied | Brutal Rain hits |
|---|---|
| 0-3 | 3 |
| 4-7 | 4 |
| 8-11 | 5 |
| 12+ | 6 |
When it gets to 5+ hits, you need to burn as many mits as possible because if you do not you WILL die. Some of my prog parties had us burn healer limit break 3 just to keep people alive during the worst of this. If you die right before this mechanic, cheese your rez immune to help soak the damage so your allies can live.
Suggestions for getting started
The normal version of this fight is very faithful to the savage version. It's actually a pretty brilliantly designed tutorial and can help you learn the savage mechanics in a low-risk environment. Most of the mechanics are basically the same as their savage counterparts with the exception of the removal of Hell in a Cell, Undead Deathmatch, the fun parts of Aetherletting, and most of the mechanics around stacks of Satisfied.
Opener
Vamp Fatale will start the fight out with a cast of Killer Voice. One healer should throw out a raidwide mit and top everyone up after the hit. In your first pull this will probably kill at least one of you. This is normal, and is a sign that you should over-mit until you get comfortable with the amount of damage you need to account for.
She will then cast Hardcore with the smallest tank AoEs in the fight. Everyone can maintain damage uptime during this mechanic. Just don't venn diagram eachother and you'll be fine.
After the Vamp Stomp, she casts Brutal Rain. Throw out an Akh Morn mit and make sure everyone is topped up for the raidwide that leads you into the next act: fighting the Coffinmaker.
Coffinmaker
Vamp Fatale changes the arena into a 4x2 grid and spawns a Coffinmaker enemy at the top of the grid. If you touch the area covered by the Coffinmaker, you instantly die. If you get hit by any Coffinmaker attacks, you get a Damage Down and Vamp Fatale gains a stack of Satisfied. Vamp Fatale doesn't throw out any auto-attacks or fire off any raidwides during this section of the fight, so healers can throw out a heal over time and focus on mechanics.
The Coffinmaker will have two saws glow blue and cast Coffinfiller. Those will become line AoEs when the cast finishes.. Vamp Fatale will also cast a Half Moon, meaning that at any point only 1/8th of the arena is safe ground.
In order to solve this:
- Notice if the orb is on the north or south side of the arena. If it is on the north side, call out that south is safe and vice versa.
- After the line AoEs fire, go diagonally opposite of where you were just standing because Vamp Fatale will fire off the opposite Half Moon as the Coffinmaker fires off another Coffinfiller with the saws that were just safe.
After the Coffinmaker casts Coffinfiller twice, it will cast Dead Wake, which will make it advance one square down the arena. If you don't kill the Coffinmaker before the end of the arena, it will enrage by destroying the floor, pushing everyone off, and wiping the party.
Suggested callouts:
- Forward: closest to the Coffinmaker
- Back: away from the Coffinmaker
- One step forward: move to the next row to avoid Dead Wake crushing you
This is the only major DPS check in this fight and the first few times will murder you. You can also tolerate at least two Damage Downs before it becomes a problem.
When the Coffinmaker gets to the end of the arena, it spawns line AoEs as normal but Vamp Fatale's Half Moons go horizontal instead of vertical.
Suggested callouts:
- Far left: far left column
- Close left: close left column
- Close right: close right column
- Far right: far right column
If you kill the Coffinmaker before Vamp Fatale's last Half Moon cast, continue respecting the Half Moons. Once the Coffinmaker is dead, Vamp Fatale becomes targetable and casts Sadistic Screech to return the arena to normal and whallop everyone with damage for good measure.
Aetherletting
Vamp Fatale will cast Crowd Kill and gain four stacks of Satisfied no matter what. She will then spawn a bunch of randomly placed AoEs over the arena. Avoid them. She'll cast another Finale Fatale raidwide to turn the arena into a circle and begins casting Aetherletting.
Aetherletting has two main parts to it:
- Vamp Fatale will spawn conal AoEs either clockwise or counterclockwise around the centre of the arena that inflicts massive damage, a damage down, a magic vuln, and gives her a stack of Satisfied.
- Two players will be targeted with a hunt marker that leaves a cardinal/intercardinal bomb that gives you a damage down and her a stack of Satisfied if you get hit by its line AoEs.
The most common strategy for this is a technique called Static Aetherletting. With Static Aetherletting your goal is to place all the hunts so that they explode in a way that avoids the line AoEs crossing the centre of the arena. Everyone stacks dead centre under the boss. I cannot stress enough, you must be DIRECTLY UNDER THE BOSS.
If you place your markers on the safe sides of the pie slices, they will all explode and you take no damage.
Once she is done with that she will cast Hardcore. The AoEs will be bigger than last time. If you aren't sure how big they are going to be, sacrifice your uptime and run away to be safe. Use a gap closer to get back to her when you're done.
She will follow up with another Vamp Stomp into a Half Moon. Assume her Half Moon AoEs are much bigger than they are to be safe.
If anyone died during the Vamp Stomp, fire off the rez right at the end of the Half Moon because she's about to cast a Brutal Rain and the more bodies you have in the stack the less damage everyone takes.
She will cast Insatiable Thirst, then Sadistic Screech, and that brings you into the adds phase.
Adds phase
In the adds phase, the arena gets shrunk to the smaller arena size from Coffinmaker but with four additional hazards added in: buzzsaws. Buzzsaws are the most terrifying part of this mechanic. If you get a bleed from the saw, you will take about 40% damage per tick. If your healers don't realize it, you will die. Make sure to avoid the saws and let your healers know instantly if you get hit by them.
Either way in this phase she spawns three additional targets: two Fatal Flails that come out after tanks soak tank towers and a Deadly Doornail. Each flail has an enrage cast of Barbed Burst. If you don't kill the flail before it finishes its cast, it will either kill people or chunk out massive parts of people's HP and give a Damage Down debuff. If both flails pop, just throw yourself off the side because you're about to die anyways.
The Deadly Doornail will spawn a purple puddle that constantly gets bigger. This puddle gives you a small damage over time debuff and is just considerably annoying.
The main tank should take the towers on the north side of the arena and the off tank should take the towers on the south side of the arena. Tanks should pop their two minute burst on at least one of the flails.
Your kill order:
- Tanks: burst the hell out of your flail as much as you can as fast as you can.
- Melee: use your standard rotation on the nail until the purple circle gets bigger than max melee range, then go help your light party tank with their flail.
- Ranged/Caster: focus the nail, then focus the flails.
- Healers: Vamp Fatale is gonna blanket this in raidwides, so mit the raidwides.
Until you get confident with this you will need to have a caster Limit Break to kill the last flail and nail pair.
Once you kill the third set of flails/nails, she casts Sadistic Screech to restore the arena.
Hell in a Cell
This is your pot window, use your gemdraughts right now and burst the hell out of the boss with your party synergy buffs. If you didn't spend it in adds phase, pop your melee Limit Break 3.
Call out that people should align their camera to north such that the A waymark is behind the boss.
Vamp Fatale will now cast Hell in a Cell. This mechanic will require you to split up into light parties and have each light party take towers in clockwise priority relative to north: tank -> healer -> melee -> ranged. Everyone else should stack in the big gap and wait for the next cast from the boss.
Vamp Fatale will cast either Ultrasonic Amp (stack) or Ultrasonic Spread (spread). If you get Amp, stack in the big gap, mit, and heal after the hit. If you get Spread, do a light role spread with the tank in the big gap, both DPS in one smaller gap, and the healer in the other smaller gap.
After both hits, the remaining cells will explode and kill people. Try to make sure all the cells are dead before the second hit finishes.
Once that's done, the other light party gets their cells. Resolve it the same way.
Undead Deathmatch / Sanguine Scratch 1
If you are doing this fight with item level 780 and up and 12% echo, this will be one of the last mechanics you see. I've seen some parties kill during this mechanic.
Vamp Fatale spawns two party towers either north/south or east/west. Split up into light parties and soak the tower. One person not being in a tower is survivable, two is iffy, more than three is a wipe. Try to have everyone in the towers or mit like your life depends on it.
When the towers explode, they will spawn two untargetable bats that apply chains to everyone. Do not stretch the chains out or you will die. Follow the bats and avoid the proteans by moving from the safe spot to the place she just attacked. Stay close to the inside so you can move as little as possible.
Once the bats get to 180 degrees away from where they started, they will either have a donut or circle marker above them. If they have a donut, stand under the bat. If they have a circle, stand near the boss.
Then you get to do this all over again.
After that, she casts another Brutal Rain. Mit and heal through this.
Act 7: Victory Lap
She will cast her final Vamp Stomp. You have the time to sort yourself out, so feel free to burn sprint and get to your spots.
She will also cast another Hardcore for the road. Respect this. This will be very meaty and the AoEs will be VERY LARGE. Tanks should go as far away as possible and heavily mitigate or pop their invulnerability skills.
There's one last cast of Sanguine Scratch but without the tether bats. Slide between the safe spots and keep doing damage.
Then there's one last Crowd Kill which makes her gain the buff Completely Satisfied. This will make her cast her enrage: Finale Fatale. If she finishes the cast, you die. Just kill the boss until it dies.
Facts and circumstances may have changed since publication. Please contact me before jumping to conclusions if something seems wrong or unclear.
Tags: